
I decided to go with my new blog. So, this morning I went through the process of mapping my domain name. I briefly took down the links from the previous post while that was being done, but everything is complete now. Please go check it out - www.scramptivity.com and leave me a comment!
Have a blessed week.
Jessica
Monday, June 9, 2008
Saturday, June 7, 2008
Scramptivity
Here's a link to the new blog I've been working on. It's called Scramptivity. And my new tagline is "Stamping + Scrapbooking + a whole lot more! Inspiration to fuel your creativity!!" I've actually purchased the domain name Scramptivity.com and once I decide which blog I want to keep, I'll map my domain to it. Once I've done that it won't matter what platform I'm on - you'll be able to find me just by typing http://www.scramptivity.com/ In the meantime, though, it's still very easy to find me because both blogs have the same sub-domain. This blog is http://www.craftingfromtheheart.blogspot.com/ and the new blog that I've been designing is http://www.craftingfromtheheart.typepad.com/ If you have a moment, please check out my new blog and tell me what you think. I'd really like some feedback on what you like (or don't like) from either blog, as I'm still trying to make a decision on whether to keep Blogger or move to Typepad. I have added some helpful links and information to the new blog which I don't currently have here. And I'm working on adding some other helpful features. Please post a comment on either blog and help me make a decision! Thanks for your help - have a blessed weekend! Jessica
Thursday, June 5, 2008
Considering a new blog platform...
Please forgive me for not posting recently. I've been taking a business coaching "bootcamp" on blogging and I'm looking at moving my blog to Typepad. I'm not sure that I like that platform, though, so I'm just doing a bit of exploring first.
Thursday, May 29, 2008
Some awesome links...
I've got some great links for you to check out today!
First, there's an awesome tutorial over on Mel's blog Mel Stampz that shows you how to make the coolest "Tool Belt" box for Dad. She also includes templates and shares her technique for making faux leather.
In her post she links to another faux leather tutorial on the blog Penelope's Pitstop. And I've got to say that Penny has created some incredibly realistic looking old leather!
Then, Penny links to a tutorial over on Julie Koerber's blog Out to Impress that shows you how to make faux suede.
Talk about talent! I love finding inspirational blogs to spark my creativity, and all three of these ladies have shared some fabulous projects and techniques!!
Hope you enjoyed!
Jessica
Wednesday, May 28, 2008
Exotic Birthday Card
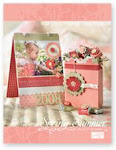
 I love having coordinating stamp sets. Here is a card that I made for my SIL's birthday using the Stitched background stamp and the Stitched Exotics stamp set.
I created a faux multi-color striped ribbon by layering a strip of 5/8" Old Olive ribbon, Whisper White card stock, and Groovy Guava double-stitched ribbon.
I also used the Rock 'n Roll technique on the large flower image, but it's very subtle here. This technique involves inking a solid image stamp in a lighter color, then rolling the outside edges in a darker color ink. If you've never tried this - give it a whirl and I think you'll like the dimension it adds.
Stamps - Stitched Exotics, Stitched background, It's Your Birthday; Paper - Ruby Red, Groovy Guava, Old Olive, Whisper White; Ink - Groovy Guava, Old Olive, Ruby Red; Accessories - Old Olive 5/8" grosgrain ribbon, Groovy Guava double-stitched ribbon, 1-3/8" square punch, 1-1/4" square punch, 1/2" circle punch, Paper Snips, Glue Dots, Sticky Strip
God Bless,
Jessica
Friday, May 23, 2008
Another Boho Grad Card
 This is the 2nd graduation card that I made for this past weekend. It is a replica of the 1st, but in blues. Here's the first card.
The only thing I did differently on the front of this card was to tone down the Night of Navy card stock by sponging on some Very Vanilla craft ink before stamping the medallion image from the Wanted set.
 I apologize for the blurry photos. My camera isn't good at close-ups.
This is how I did the inside. I wanted to have a pocket to place money and a birthday tag. Our nephew turned 18 the day after he graduated, so I turned this into a combination graduation/birthday card!
 Here's a closeup of the sentiments on the inside. I used 2 of the definitions from Define Your Life.
 Here is a closeup of the birthday tag.
I'd say that this is the most "complete" card that I've ever made. I really tried to create a finished look on the inside and carry the theme through from the front. I went back and completed the inside of the first Boho Grad card the same way.
Stamps - Paisley (background), Define Your Life, Wanted, Live Your Dream, It's Your Birthday, Sanded (background); Paper - Close to Cocoa, Chocolate Chip, Bashful Blue, Brocade Blue, Night of Navy, Very Vanilla; Ink - Brocade Blue, Night of Navy, Close to Cocoa, Very Vanilla craft; Accessories - Chocolate Chip 5/8" grosgrain ribbon, Night of Navy 1/4" grosgrain ribbon, Vintage Brads, Twill Tape, Dimensionals, Stamping Sponges, Key Tag punch, Scallop Circle punch, 1/16" Handheld Circle punch, Small Star punch, Paper Snips, Glue Dots, Snail, Sticky Strip
Thursday, May 22, 2008
A Groovin' Scrapfolio
Well, we're back from our trip out of state, but I haven't had a chance to make anything new yet. So here's something fun we made at the first demo meeting I attended back in March. I don't know what it's called officially, but I'm calling it a Scrapfolio. It was a lot of fun to make and I hope you enjoy looking at it. I apologize in advance about the picture quality - I need to invest in a new camera and some photo editing software!
 This is the front cover. I used the Live Your Dream set for the focal image and a sentiment from Enjoy Every Moment. The colors used throughout this project are the ones used in the Ginger Blossoms DSP: Groovy Guava, Ruby Red, and River Rock.
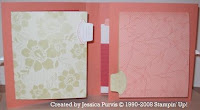 This is a picture with the left flap open. There is a "card" on the opposite side of the front cover, and another "card" on the "outside" of the right flap. The next two pics show the left card open and then the right card open.


 This is the inside of the Scrapfolio with both flaps open. The left "card" is also open. The center section is an "accordian file" made up of envelopes.
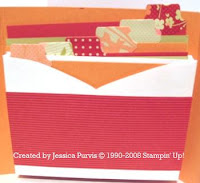 Here is a closeup of the center section. It was made with 6 envelopes that had their top flap tucked inside and were then adhered together and attached to the scrapfolio. I used Snail in an "X" pattern to glue the envelopes in pairs back to back, and then those pairs were glued together (front to front). Sticky Strip was used to adhere the "accordian" to the folio.
I really loved making this album and I think it would look great displayed on a coffee table where visitors could open it up and discover all the neat little "hidden" pictures and journaling inside.
Stamps - Live Your Dream, Enjoy Every Moment, Totally Tabs; Paper - Textured Groovy Guava, River Rock, Ruby Red, Groovy Guava, Ginger Blossoms DSP, Whisper White; Ink - Groovy Guava, River Rock, Ruby Red; Accessories - Round Tab Punch, Stamping sponges, Sticky Strip, Snail; non-SU! ribbon
God Bless!
Jessica
 This is the front cover. I used the Live Your Dream set for the focal image and a sentiment from Enjoy Every Moment. The colors used throughout this project are the ones used in the Ginger Blossoms DSP: Groovy Guava, Ruby Red, and River Rock.
 This is a picture with the left flap open. There is a "card" on the opposite side of the front cover, and another "card" on the "outside" of the right flap. The next two pics show the left card open and then the right card open.

 This is the inside of the Scrapfolio with both flaps open. The left "card" is also open. The center section is an "accordian file" made up of envelopes.
 Here is a closeup of the center section. It was made with 6 envelopes that had their top flap tucked inside and were then adhered together and attached to the scrapfolio. I used Snail in an "X" pattern to glue the envelopes in pairs back to back, and then those pairs were glued together (front to front). Sticky Strip was used to adhere the "accordian" to the folio.
I really loved making this album and I think it would look great displayed on a coffee table where visitors could open it up and discover all the neat little "hidden" pictures and journaling inside.
Stamps - Live Your Dream, Enjoy Every Moment, Totally Tabs; Paper - Textured Groovy Guava, River Rock, Ruby Red, Groovy Guava, Ginger Blossoms DSP, Whisper White; Ink - Groovy Guava, River Rock, Ruby Red; Accessories - Round Tab Punch, Stamping sponges, Sticky Strip, Snail; non-SU! ribbon
God Bless!
Jessica
Tuesday, May 13, 2008
Elegant Thank-You Card
 This is one of my favorite cards. And, I'll admit that it's a pretty close CASE of a card by Maren(mmbc). Click here to see her card. Several things to note: Maren used Close to Cocoa card stock and ink - I used Chocolate Chip; she used a piece of Afternoon Tea DSP - I stamped Soft Sky on Soft Sky to create my own patterned paper; she used the corner rounder to make her scallops - I used the slit punch; and if you look closely there's a few other minor changes, as well.
This was my first attempt at a really detailed layered card. I'm not completely satisfied with it, but I'm trying to curb my perfectionist tendencies and just let things go. It's really not too bad, if I don't say so myself! One thing I learned from this was not to try to ink the edges AFTER assembling the layers, lol!
By the way - this isn't the card that I promised in the previous post. I've got a specific card in mind for that - another CASE, btw ;-) We're going out of town later this week, so I may not get that card done until we come back. But I promise to post it when I get it done.
Stamps -Live Your Dream, All Holidays; Paper - Chocolate Chip, Groovy Guava, Soft Sky, Whisper White; Ink - Soft Sky, Groovy Guava, Chocolate Chip; Accessories - Chocolate Chip 5/8" grosgrain ribbon, Vintage brads, Large Oval punch, Slit punch, Ticket Corner punch, 1/16" handheld circle punch, Paper Piercer, Mat Pack, dimensionals
Bloomin'
 I just love the Bloomin' Beautiful set! Here's the second Mother's Day card that I made. This one showcases the
Ginger Blossoms DSP.
I really like using patterned paper on my cards. It's just a really fast, easy way to "kick it up a notch." Almost all of my cards, before signing up to be a demo, used patterned paper. But since becoming a demo I've made a conscious effort to NOT use as much DSP. I want to learn how to use my stamps to make my own coordinating "patterned papers."
The work of many talented ladies out there has inspired me to go beyond my "comfort zone" and keep on trying new things. If you're like me and always reach for that patterned paper when making a card, I challenge you to try making your own! You might be pleasantly surprised at how much you like it.
I think the easiest way to get started is to take an image from whatever set you're using and randomly stamp it on your card stock in Versamark. Sometimes that's all you need to add a little dimension to a card.
Another thing I've discovered - I LOVE Stampin' Up!'s background stamps. They're perfectly sized for a regular 4.25" x 5.5" card. And you can use them singly or together to create some really awesome "patterned papers." I'll work up a sample to show you what I mean.
But for now - take the challenge and try something you've never done before! Step out of your stamping comfort zone. Try one of the following -
- Add more layers - or get creative with "shaped" layers
- Add some distressing - this could include: replacing straight edges with torn edges; sponging some ink on the edges; crumpling and smoothing mat layers; using the Cutter Kit to make rough edges.
- Make your own patterned paper - this could include: randomly stamping on colored card stock in versamark; using a background stamp with coordinating ink and card stock; combining 2 or more background stamps in several colors; combining a background stamp with other randomly stamped images
God Bless!
Jessica
Stamps - Bloomin' Beautiful; Paper - Ginger Blossoms DSP, Groovy Guava, Ruby Red, Whisper White; Ink - Groovy Guava, Ruby Red, Basic Gray, Wild Wasabi, Versamark; Accessories - Groovy Guava double-stitched ribbon, Ticket Corner punch, Embossing Buddy, Clear EP, Heat Tool
EARLY F/W Catalog Sneak Peek Purchase Opp
Wow!! SU is offering it's customers a really unique opportunity in June. They normally allow customers to preview a select number of items that will be coming out in the new catalog, but they don't let customers PURCHASE them early. Well that is about to change!
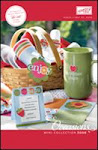
In June they're allowing you the opportunity to get your hands on one of the new stamp sets from the upcoming Fall/Winter Idea Book & Catalog AND a coordinating set of die-cut notecards with envelopes! There's two ways you can get them:

In June they're allowing you the opportunity to get your hands on one of the new stamp sets from the upcoming Fall/Winter Idea Book & Catalog AND a coordinating set of die-cut notecards with envelopes! There's two ways you can get them:
- you can either purchase them - the Fresh Cut stamp set for $21.95 (set of 5) and the Fresh Cut Notes for $5 (with the purchase of the Fresh Cut set or $8.95 separately)
- OR you can get them both for FREE when you hostess a $400 workshop (and that's in addition to your regular hostess benefits)!! What an awesome deal.

Sunday, May 11, 2008
Happy Mother's Day!!
To every mother out there -- this is YOUR day! Let's celebrate the wonderful gift of motherhood. I pray that you have a great and wonderful day -- God bless you for all that you do! Happy Mother's Day!!
 Here's one of the Mother's Day cards that I did this year. And below is a closeup of the layering. I popped a few of the flowers up on dimensionals to give it a more 3D look.
And here's a neat little trick to use when you don't have the right color of Craft ink and you want to heat emboss - load up the stamp first with Versamark, and then with the desired color of Classic ink. It will stay wet long enough to add embossing powder.
I didn't actually do that here, though. I stamped the sentiment in versamark, added the clear EP, and when it was heated, the color darkened. I love how it looks!
 Stamps - Bloomin' Beautiful (Occasions mini), All Holidays; Paper - Bashful Blue, Sahara Sand, Wild Wasabi, Whisper White; Inks - Sahara Sand, Creamy Caramel, Versamark, Wild Wasabi, Bashful Blue, Ballet Blue, Almost Amethyst, Lavender Lace; Accessories - Bashful Blue Striped Ribbon, Silver brads, Clear Embossing Powder, Ticket Corner punch, Photo Corner punch, Horizontal Slot punch, Corner Rounder punch, 1/16" handheld circle punch, Dimensionals, Aqua Painters
I also used non-SU! rubons and I gave the bashful blue base some "texture" by using a Fiskars brayer that has a textured pattern similar to the SU! Canvas background stamp. It's tone on tone so you can't really see it in the pic, but it gives it a subtle dimension IRL. I got this "brayer" at a "garage sale" at a nearby LSS and thought it would be a cheaper alternative to getting the Canvas background, but I had a hard time getting it to stamp evenly. The patchy look might be useful for some projects, but I'm definitely going to be buying that background stamp now. Sometimes "shortcuts" and "cheaper alternatives" just don't work as well!
Wishing you a blessed week!
Jessica
Thursday, May 8, 2008
Don't throw away your old CD's!!!
Most all of us have old software CD's lying around somewhere, or miscellaneous CD's we've gotten in the mail, or CD's or even DVD's that didn't burn properly. Well here's a great project that'll help you put those items to good use!
Stamps - Baroque Motifs, Weathered background, True Friend, A Beautiful Thing, Enjoy Every Moment, Priceless; Paper - Close to Cocoa, Certainly Celery, Pale Plum, Whisper White; Ink - Chocolate Chip, Perfect Plum, Versamark; Stampin' Write Markers - Certainly Celery, Old Olive, Perfect Plum, Pale Plum; Accessories - Chocolate Chip 5/8" grosgrain ribbon, Certainly Celery 1/4" grosgrain ribbon, Whisper White 1/4" grosgrain ribbon, vintage brads, Ticket Corner punch, 1/16" handheld circle punch, Key Tag punch, paper snips, Crop-A-Dile
 | This is an altered CD album. Mine only has 2 "pages" but you could certainly add more to your album. The base for the inside pages could be covered CD's or just plain card stock, whichever you prefer. |
 | Here's a tip for punching holes in CD's and even tougher things like tin pails - use the Crop-A-Dile. It has industrial strength punching power! |
Stamps - Baroque Motifs, Weathered background, True Friend, A Beautiful Thing, Enjoy Every Moment, Priceless; Paper - Close to Cocoa, Certainly Celery, Pale Plum, Whisper White; Ink - Chocolate Chip, Perfect Plum, Versamark; Stampin' Write Markers - Certainly Celery, Old Olive, Perfect Plum, Pale Plum; Accessories - Chocolate Chip 5/8" grosgrain ribbon, Certainly Celery 1/4" grosgrain ribbon, Whisper White 1/4" grosgrain ribbon, vintage brads, Ticket Corner punch, 1/16" handheld circle punch, Key Tag punch, paper snips, Crop-A-Dile
Tuesday, May 6, 2008
Going to Salt Lake...
Well, a lot has happened today! First of all, I'm going to Stampin' Up!'s 20th Anniversary Convention this summer in Salt Lake City, UT and today was the first day of registration. I almost decided not to go, because I found out late last night that the demo that I had planned on rooming with isn't going to be attending convention afterall. But I thought it over and decided that I'm going, even if I have to room by myself!! It's going to be a blast and I don't want to miss it.
Another big event for me today was that I finally got to talk to an advisor and sign-up for classes. After taking the last 3 years off to have 2 children, I've decided to go back to school and finish my degree! Needless to say, I'm going to be extremely busy this fall between trying to build my business, go to school, and balance both of those with family and church! But in the long run, it will definitely be worth it.
I actually managed to get 3 cards made yesterday, but I can't post them yet. Two of them were Mother's Day cards and I don't want them getting any previews. So Mom, if you're reading this - you're just going to have to wait until you get it in the mail!
Hope you all have a great day!
Jessica
Friday, May 2, 2008
We're Sick But...Life Is Good!
 Sorry for not posting the last day or two, but we've been dealing with one of those nasty viruses that usually only last 24 hours. In our case it's been more like 48 hours.
But here's the perfect card to cheer us up. This was actually the first make 'n take we did at my first monthly demonstrator meeting. We have a great group of ladies in the Stampin' Daze group and Amy Smith was the gal who designed this for us. Thanks Amy!
I'm not a Bold Brights gal, but I really like this card. It uses the cute Tart & Tangy set from the Occasions Mini and the Level 1 Hostess set Make It Count. We used Stampin' Write markers to color directly on the rubber. A square punch (1-1/4" I believe) and the spiral punch complete the filmstrip look.
Those bold bright colors are just what you need to cheer you up, whether it's a rainy day or a sick day! And here's something else to cheer you up -- Stampin' Up! has extended the date for the Occasions Mini Collection. It was scheduled to end on May 31st, but you now have one more month to get these items. The Occasions Mini Collection will now end on June 30th.
Wishing you a healthy, happy day!
Jessica
Wednesday, April 30, 2008
Boho/West Themed Graduation Card
 Today, I wanted to share a graduation card that I made for my cousin. I actually used this card for my very first swap, as well.
I used the Boho West - Style Watch colors for this card: Very Vanilla, Close to Cocoa, Chocolate Chip, Purely Pomegranate, Regal Rose, and Pretty in Pink.
- The Paisley background was stamped in Close to Cocoa classic ink on Close to Cocoa card stock.
- The medallion image from the Wanted set was stamped in CTC on Purely Pomegranate and then punched with the scallop circle and sponged with Close to Cocoa.
- The sentiment is from the Occasions Mini set Live Your Dream and is stamped in CTC, and both the Pretty in Pink and the Regal Rose layers were sponged with CTC.
- The paisley and star were stamped with Very Vanilla craft ink on Choc Chip, cut out, and attached with dimensionals.
- And I used glue dots to attach the ribbon.
Stamps - Wanted, Live Your Dream; Paper - Close to Cocoa, Chocolate Chip, Regal Rose, Pretty in Pink, Purely Pomegranate; Ink - Close to Cocoa (classic), Very Vanilla (craft); Accessories - Chocolate Chip 5/8" Grosgrain, Vintage brads, Dimentionals, Sponges, 1/16" handheld circle punch
Hope you enjoyed the card today.
God Bless!
Jessica
Tuesday, April 29, 2008
Time Spent With Friends
Time spent with friends is always time WELL spent. That's one of the reasons I love Stampin' Up! It gives us one more reason to spend time together having fun!
My first hostess wanted to earn the Level 3 set called "Time Well Spent." It is such a beautiful set with so many pieces. I'm glad to report that she was able to get it!! So here is a card that I made using that set.
 It is very simple and uses only 2 colors: Groovy Guava and Ruby Red, along with Whisper White. I stamped the Floral background in Groovy Guava ink on Groovy Guava card stock and layered that on a Whisper White base.
The flower and sentiment from Time Well Spent were watercolored using the Groovy Guava and Ruby Red Classic Ink Pads and a blender pen. A Fire rhinestone brad adds just a touch of bling to the center of the flower.
You could easily change the stamp sets and colors used to make this and have a card to suit any occasion.
Stamps - Floral (background), Time Well Spent (Hostess Level 3); Paper - Whisper White, Groovy Guava, Ruby Red; Ink - Basic Black, Groovy Guava, Ruby Red; Accessories - Fire Rhinestone Brad, Blender Pen, Paper Snips
Monday, April 28, 2008
MOO-ve Over!!
 I found this picture from years ago and thought it would make a funny scrapbook layout. BTW - this is my very first 6x6 page! The Really Rust paper matched the photo perfectly and the Hemp Twine and torn edge added that perfect touch of rustic.
I used Tombo Mono Multi liquid glue to adhere the twine. It did leave shiny spots where there was excess. The neat thing about Stampin' Up! is that they carry so many color coordinating products. I just applied some Really Rust pastel (chalk) to those areas and it really blended them in. You can still see them if you look closely, but they've got a matte look now so they're not as noticeable.
One other thing I wanted to mention was how I adhered the ribbon on the corners. I could have cut the edges even with the card stock but I decided to wrap it around to the back instead. I had never tried this before and had just bought some Mono Multi to try out, so that's what I used first. Unfortunately, not only did the Mono Multi not hold it, but it caused the color from the Really Rust paper to bleed right through the ribbon. Yuck! So I replaced it and tried Glue Dots on the back. Those aren't holding either, so next time I do this I will use Sticky Strip.
Paper - Really Rust, Basic Black, Soft Sky; Accessories - Natural Hemp Twine, Signo White Gel Pen, Soft Sky double-stitched ribbon, Twill Tape. I also used a non-SU! black gel pen for my journaling
God bless!
Jessica
Saturday, April 26, 2008
My Calendar
Just wanted to post a list of the things on my calendar. I'm going to place a link to this post in the left sidebar. So if you ever want to know what I've got going on, just click on that link and it will bring you back to this post. I'm going to keep this list updated on a regular basis - so be sure to check this out periodically.
- June 1 - Fresh Cut promo begins
- June 1 - eScape promo begins
- June 13 - WORKSHOP
- June 15 - List of stamp sets that will be RETIRING comes out
- June 30 - Occasions Mini Collection ends
- June 30 - Fresh Cut promo ends
- Juen 30 - eScape promo ends
- July 1 - Demonstrator's can begin ordering Sneak Peek items for the F/W catalog
- July 12 - Creative Crafts Class - Scrapbook Centerpiece
- July 30 - Aug 2 -- 20th Anniversary CONVENTION in Salt Lake City!!
- Aug 10 - LAST DAY for Spring/Summer catalog
- Aug 11 - First Day of NEW Fall/Winter catalog
- Aug 11 - New Catalog Open House
We all need a little inspiration
This is one of the door prizes that I made for my first open house. It's a covered Jr. legal pad. On the outside of the cover I stamped the definition for "Inspire" from the Define Your Life set.
On the inside I stamped the sentiment from the Live Your Dream set shown in the Occasions Mini. There's also a pocket on the inside. I made a beaded pen to match, but I haven't taken a picture of that yet. I'll update this post later so you can see both of them together.

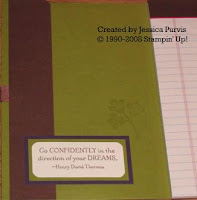
The second picture shows you what it looks like inside. Click on it to see a bigger image. If you looks closely you'll see the curved edge of the pocket on the left side.
Stamps - True Friend, Define Your Life, Scratched, Live Your Dream; Paper - Elegant Eggplant, Old Olive, Chocolate Chip, Close to Cocoa, Whisper White; Ink - Elegant Eggplant, Old Olive, Chocolate Chip, Versamark; Accessories - Chocolate Chip 5/8" Grosgrain ribbon, Vintage brads; Punches - 3/16" Corner Rounder, Ticket Corner, 1/16" handheld circle
My Favorite Card!!
 Just thought I'd share my favorite card with you. Of course, I'll probably have a new favorite pretty soon, but this is it for right now. ;-)
Isn't it pretty!! This is the "toile" look. All you need to do this is matching ink and cardstock in one color. This is one of the simplest things you can do and it makes a really striking card.
Stamps - Lovely As A Tree, Live Your Dream (sentiment); Paper - Blue Bayou, Whisper White; Ink - Blue Bayou; Accessories - Blue Bayou double-stitched ribbon, Styled Silver Hodgepodge hardware; Punch - Designer Label
I see some chocolate hiding in there...

This is the second project we made last night at my very first workshop. Aren't they cute!! They're called Peek-a-Boo Boxes. I did forget to have them tie the ribbon on, though -- Sorry ladies! The second photo shows them open. I used the "Hugs & Kisses" stamp from the All Holidays set to decorate the outside. So, of course, I had to put Hershey's Hugs and Kisses on the inside! Who doesn't love chocolate!!
 These darling little boxes would make great party favors, Secret Sister gifts, or all occasion gift giving boxes for smaller items.
Box on the Right: Stamps - Boho Backgrounds, Priceless, All Holidays; Paper - Close to Cocoa, Certainly Celery, Purely Pomegranate, Groovy Guava, Whisper White; Ink - Versamark, Groovy Guava, Purely Pomegranate; Accessories - Vintage brads, Purely Pomegranate double-stitched ribbon; Punches - 5 Petal Flower, Boho Blossoms, 3/4" circle; 1/16" handheld circle; 1-1/4" circle, 1-1/4" square
Box on the Left - Stamps - Priceless, All Holidays; Paper - Groovy Guava, River Rock, Purely Pomegranate, Whisper White; Ink - Versamark, Groovy Guava, Purely Pomegranate; Accessories - Eyelets (Basic: Sahara Sand), Purely Pomegranate double-stitched ribbon; Punches - 5 Petal Flower, Boho Blossoms, 3/4" circle, 1-1/4" circle, 1-1/4" square; Crop-A-Dile
Friday, April 25, 2008
New Look!
I discovered this wonderful site today to help new blogger's learn their way around. If you're interested in starting your own blog, or improving one you already have -- go check it out at http://tips-for-new-bloggers.blogspot.com/
I followed the article instructions from this site to convert my 2 column blog template to a 3 column one, add a search box, and center my header. If I had more time before my workshop tonight, I'd make some more improvements, as well. I can already see why so many people have blogs - they're addicting! But not quite as much as stamping and scrapbooking, lol!!
So, if you happen to stop by my blog and it looks "weird" it's probably because I'm in the middle of playing around with it! ;-)
First Workshop Tonight!
Well, I've spent the last couple of days getting ready for my first workshop, and tonight is the big night! The funny thing is that I'm not nervous any more, or at least not at this present moment ;-)
I'm just excited. I really enjoy making things from the heart. And I think I'm going to enjoy sharing this passion with others and seeing others discover their creative potential almost as much as I enjoy making things with my own hands. I may enjoy it MORE!
Well, I've got to make some final preparations. So, ladies - I hope we see you at the workshop tonight! I've got some fun things planned that you won't want to miss.
May God's blessings be upon you!
Jessica
Wednesday, April 23, 2008
Big Announcement!!
For those of you who have never bought Stampin' Up! products, this might not seem like very big news. But for those that have - it's huge! As of today, Stampin' Up! is now accepting customer credit cards!! This includes debit cards, as well. And if you need to split your order between two forms of payment, we can also do that.
So with that happy news - I wish you a blessed day!
Jessica
So with that happy news - I wish you a blessed day!
Jessica
Tuesday, April 22, 2008
New Scrapbooking Class!
I've scheduled my first scrapbooking class. It's officially titled "Quick & Easy Scrapbooks" and it's going to be held Saturday, June 7th from 3:30 - 5:30. I plan on doing 2, maybe 3 projects.
These will include:
1. Either an altered CD album OR a coaster album
2. A scrap portfolio OR a papersack album
3. And possibly a darling little "purse" album.
So if you'd like to scrapbook, but don't think you have the time -- or if you already create traditional scrapbooks and would like some help scrapping "outside the page" then this is the class for you!
I'm not sure of the location yet, so seating may be limited. And I have to work out a price still. If you're interested, please e-mail me to get more information!
A Girl's Best Friend
My best friend rocks. And , no, I'm not talking about diamonds or rubies. I'm talking about my best friend Tanya. She's so awesome she convinced my DH to let me go to Stampin' Up!'s 20th Anniversary Convention this summer in Salt Lake City!! How cool is that! (I'll be posting more on this at a later date.)
She and I are taking the kids to the Sedgwick County Zoo today for Earth Day. Their website said there were almost 8000 attendees last year. Can you picture trying to wade through thousands of kids, without losing your own, just to see see the lions and tigers and bears! Oh my! I think we're a little crazy, don't you?! Pray for us!
When I get back later today, I've got to get the materials prepared for Tanya's workshop on Friday. I'll be demonstrating watercoloring and then we're going to be making a card and a Peek-a-Boo box. They're cute, if I don't say so myself ;-)
Have a great and wonderful day!
Jessica
Monday, April 21, 2008
Getting Started...
Well, I've decided to give blogging a try. This is all new to me, so please bear with me as I learn my way around :-)
I hope soon to have a bunch of fun projects listed here, and maybe even some tutorials, sketchs, and templates. I have my first workshop Friday night, though, and I'm pretty nervous. I've been trying to get everything ready and practice enough so that I can give a smooth demonstration. So, I might not get any pictures posted here until next week. Hopefully between now and then I can learn how to get this blog looking and functioning the way I'd like.
Have a great and blessed week!
Jessica
Subscribe to:
Posts (Atom)
