I decided to go with my new blog. So, this morning I went through the process of mapping my domain name. I briefly took down the links from the previous post while that was being done, but everything is complete now. Please go check it out - www.scramptivity.com and leave me a comment!
Have a blessed week.
Jessica
Monday, June 9, 2008
Saturday, June 7, 2008
Scramptivity
Here's a link to the new blog I've been working on. It's called Scramptivity. And my new tagline is "Stamping + Scrapbooking + a whole lot more! Inspiration to fuel your creativity!!" I've actually purchased the domain name Scramptivity.com and once I decide which blog I want to keep, I'll map my domain to it. Once I've done that it won't matter what platform I'm on - you'll be able to find me just by typing http://www.scramptivity.com/ In the meantime, though, it's still very easy to find me because both blogs have the same sub-domain. This blog is http://www.craftingfromtheheart.blogspot.com/ and the new blog that I've been designing is http://www.craftingfromtheheart.typepad.com/ If you have a moment, please check out my new blog and tell me what you think. I'd really like some feedback on what you like (or don't like) from either blog, as I'm still trying to make a decision on whether to keep Blogger or move to Typepad. I have added some helpful links and information to the new blog which I don't currently have here. And I'm working on adding some other helpful features. Please post a comment on either blog and help me make a decision! Thanks for your help - have a blessed weekend! Jessica
Thursday, June 5, 2008
Considering a new blog platform...
Please forgive me for not posting recently. I've been taking a business coaching "bootcamp" on blogging and I'm looking at moving my blog to Typepad. I'm not sure that I like that platform, though, so I'm just doing a bit of exploring first.
Thursday, May 29, 2008
Some awesome links...
I've got some great links for you to check out today!
First, there's an awesome tutorial over on Mel's blog Mel Stampz that shows you how to make the coolest "Tool Belt" box for Dad. She also includes templates and shares her technique for making faux leather.
In her post she links to another faux leather tutorial on the blog Penelope's Pitstop. And I've got to say that Penny has created some incredibly realistic looking old leather!
Then, Penny links to a tutorial over on Julie Koerber's blog Out to Impress that shows you how to make faux suede.
Talk about talent! I love finding inspirational blogs to spark my creativity, and all three of these ladies have shared some fabulous projects and techniques!!
Hope you enjoyed!
Jessica
Wednesday, May 28, 2008
Exotic Birthday Card
 I love having coordinating stamp sets. Here is a card that I made for my SIL's birthday using the Stitched background stamp and the Stitched Exotics stamp set.
I created a faux multi-color striped ribbon by layering a strip of 5/8" Old Olive ribbon, Whisper White card stock, and Groovy Guava double-stitched ribbon.
I also used the Rock 'n Roll technique on the large flower image, but it's very subtle here. This technique involves inking a solid image stamp in a lighter color, then rolling the outside edges in a darker color ink. If you've never tried this - give it a whirl and I think you'll like the dimension it adds.
Stamps - Stitched Exotics, Stitched background, It's Your Birthday; Paper - Ruby Red, Groovy Guava, Old Olive, Whisper White; Ink - Groovy Guava, Old Olive, Ruby Red; Accessories - Old Olive 5/8" grosgrain ribbon, Groovy Guava double-stitched ribbon, 1-3/8" square punch, 1-1/4" square punch, 1/2" circle punch, Paper Snips, Glue Dots, Sticky Strip
God Bless,
Jessica
Friday, May 23, 2008
Another Boho Grad Card
 This is the 2nd graduation card that I made for this past weekend. It is a replica of the 1st, but in blues. Here's the first card.
The only thing I did differently on the front of this card was to tone down the Night of Navy card stock by sponging on some Very Vanilla craft ink before stamping the medallion image from the Wanted set.
 I apologize for the blurry photos. My camera isn't good at close-ups.
This is how I did the inside. I wanted to have a pocket to place money and a birthday tag. Our nephew turned 18 the day after he graduated, so I turned this into a combination graduation/birthday card!
 Here's a closeup of the sentiments on the inside. I used 2 of the definitions from Define Your Life.
 Here is a closeup of the birthday tag.
I'd say that this is the most "complete" card that I've ever made. I really tried to create a finished look on the inside and carry the theme through from the front. I went back and completed the inside of the first Boho Grad card the same way.
Stamps - Paisley (background), Define Your Life, Wanted, Live Your Dream, It's Your Birthday, Sanded (background); Paper - Close to Cocoa, Chocolate Chip, Bashful Blue, Brocade Blue, Night of Navy, Very Vanilla; Ink - Brocade Blue, Night of Navy, Close to Cocoa, Very Vanilla craft; Accessories - Chocolate Chip 5/8" grosgrain ribbon, Night of Navy 1/4" grosgrain ribbon, Vintage Brads, Twill Tape, Dimensionals, Stamping Sponges, Key Tag punch, Scallop Circle punch, 1/16" Handheld Circle punch, Small Star punch, Paper Snips, Glue Dots, Snail, Sticky Strip
Thursday, May 22, 2008
A Groovin' Scrapfolio
Well, we're back from our trip out of state, but I haven't had a chance to make anything new yet. So here's something fun we made at the first demo meeting I attended back in March. I don't know what it's called officially, but I'm calling it a Scrapfolio. It was a lot of fun to make and I hope you enjoy looking at it. I apologize in advance about the picture quality - I need to invest in a new camera and some photo editing software!
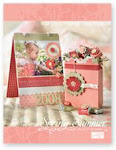
 This is the front cover. I used the Live Your Dream set for the focal image and a sentiment from Enjoy Every Moment. The colors used throughout this project are the ones used in the Ginger Blossoms DSP: Groovy Guava, Ruby Red, and River Rock.
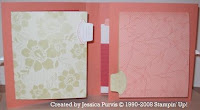 This is a picture with the left flap open. There is a "card" on the opposite side of the front cover, and another "card" on the "outside" of the right flap. The next two pics show the left card open and then the right card open.


 This is the inside of the Scrapfolio with both flaps open. The left "card" is also open. The center section is an "accordian file" made up of envelopes.
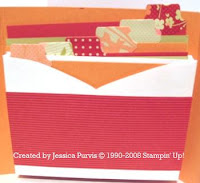 Here is a closeup of the center section. It was made with 6 envelopes that had their top flap tucked inside and were then adhered together and attached to the scrapfolio. I used Snail in an "X" pattern to glue the envelopes in pairs back to back, and then those pairs were glued together (front to front). Sticky Strip was used to adhere the "accordian" to the folio.
I really loved making this album and I think it would look great displayed on a coffee table where visitors could open it up and discover all the neat little "hidden" pictures and journaling inside.
Stamps - Live Your Dream, Enjoy Every Moment, Totally Tabs; Paper - Textured Groovy Guava, River Rock, Ruby Red, Groovy Guava, Ginger Blossoms DSP, Whisper White; Ink - Groovy Guava, River Rock, Ruby Red; Accessories - Round Tab Punch, Stamping sponges, Sticky Strip, Snail; non-SU! ribbon
God Bless!
Jessica
 This is the front cover. I used the Live Your Dream set for the focal image and a sentiment from Enjoy Every Moment. The colors used throughout this project are the ones used in the Ginger Blossoms DSP: Groovy Guava, Ruby Red, and River Rock.
 This is a picture with the left flap open. There is a "card" on the opposite side of the front cover, and another "card" on the "outside" of the right flap. The next two pics show the left card open and then the right card open.

 This is the inside of the Scrapfolio with both flaps open. The left "card" is also open. The center section is an "accordian file" made up of envelopes.
 Here is a closeup of the center section. It was made with 6 envelopes that had their top flap tucked inside and were then adhered together and attached to the scrapfolio. I used Snail in an "X" pattern to glue the envelopes in pairs back to back, and then those pairs were glued together (front to front). Sticky Strip was used to adhere the "accordian" to the folio.
I really loved making this album and I think it would look great displayed on a coffee table where visitors could open it up and discover all the neat little "hidden" pictures and journaling inside.
Stamps - Live Your Dream, Enjoy Every Moment, Totally Tabs; Paper - Textured Groovy Guava, River Rock, Ruby Red, Groovy Guava, Ginger Blossoms DSP, Whisper White; Ink - Groovy Guava, River Rock, Ruby Red; Accessories - Round Tab Punch, Stamping sponges, Sticky Strip, Snail; non-SU! ribbon
God Bless!
Jessica
Subscribe to:
Posts (Atom)

